Category Archives: DIY Craftiness

Red, White, and Blueberry- 4th Of July – Philadelphia Wedding and Event Planner – Angela Malicki Events

Summer time is here again! Warm weather, weekend getaways to the shore, and romantic nights under the stars. This week is the fourth of July and what better way to celebrate the independence of our country than a candle lit picnic and create your own fireworks!
Of course you will need a bottle of wine or champagne to celebrate along with two glasses, candles (battery operated of course!), and some desert. My favorite Fourth of July desert is my Red White and Blueberry pie! There isnā€™t anything more American than pie and fireworks! Pack a cozy blanket and you and your man will be ready for a romantic night.
Find a secluded spot to watch your town or cities fire work display. Lay out your blanket and cuddle up with your loved one. Who needs sparklers when the sparks are bound to fly with a romantic night like this!

RED, WHITE AND BLUEBERRY PIE
1/2 Package refrigerated pie crust (1 crust) or use your own crust recipe
1 quart fresh strawberries, divided
4 squares(1ounce each) white choc. for baking
1 package(8ounces) cream cheese, softened
3/4 cup cold milk
1 package(3.3 ounces) white choc. instant pudding/pie filling
1 1/2 cups fresh blueberries
1 cup thawed, frozen whipped topping
IMG_1878

PREHEAT OVEN 425 degrees
-Roll out crust and place into pie plate. prick bottom and sides with fork.
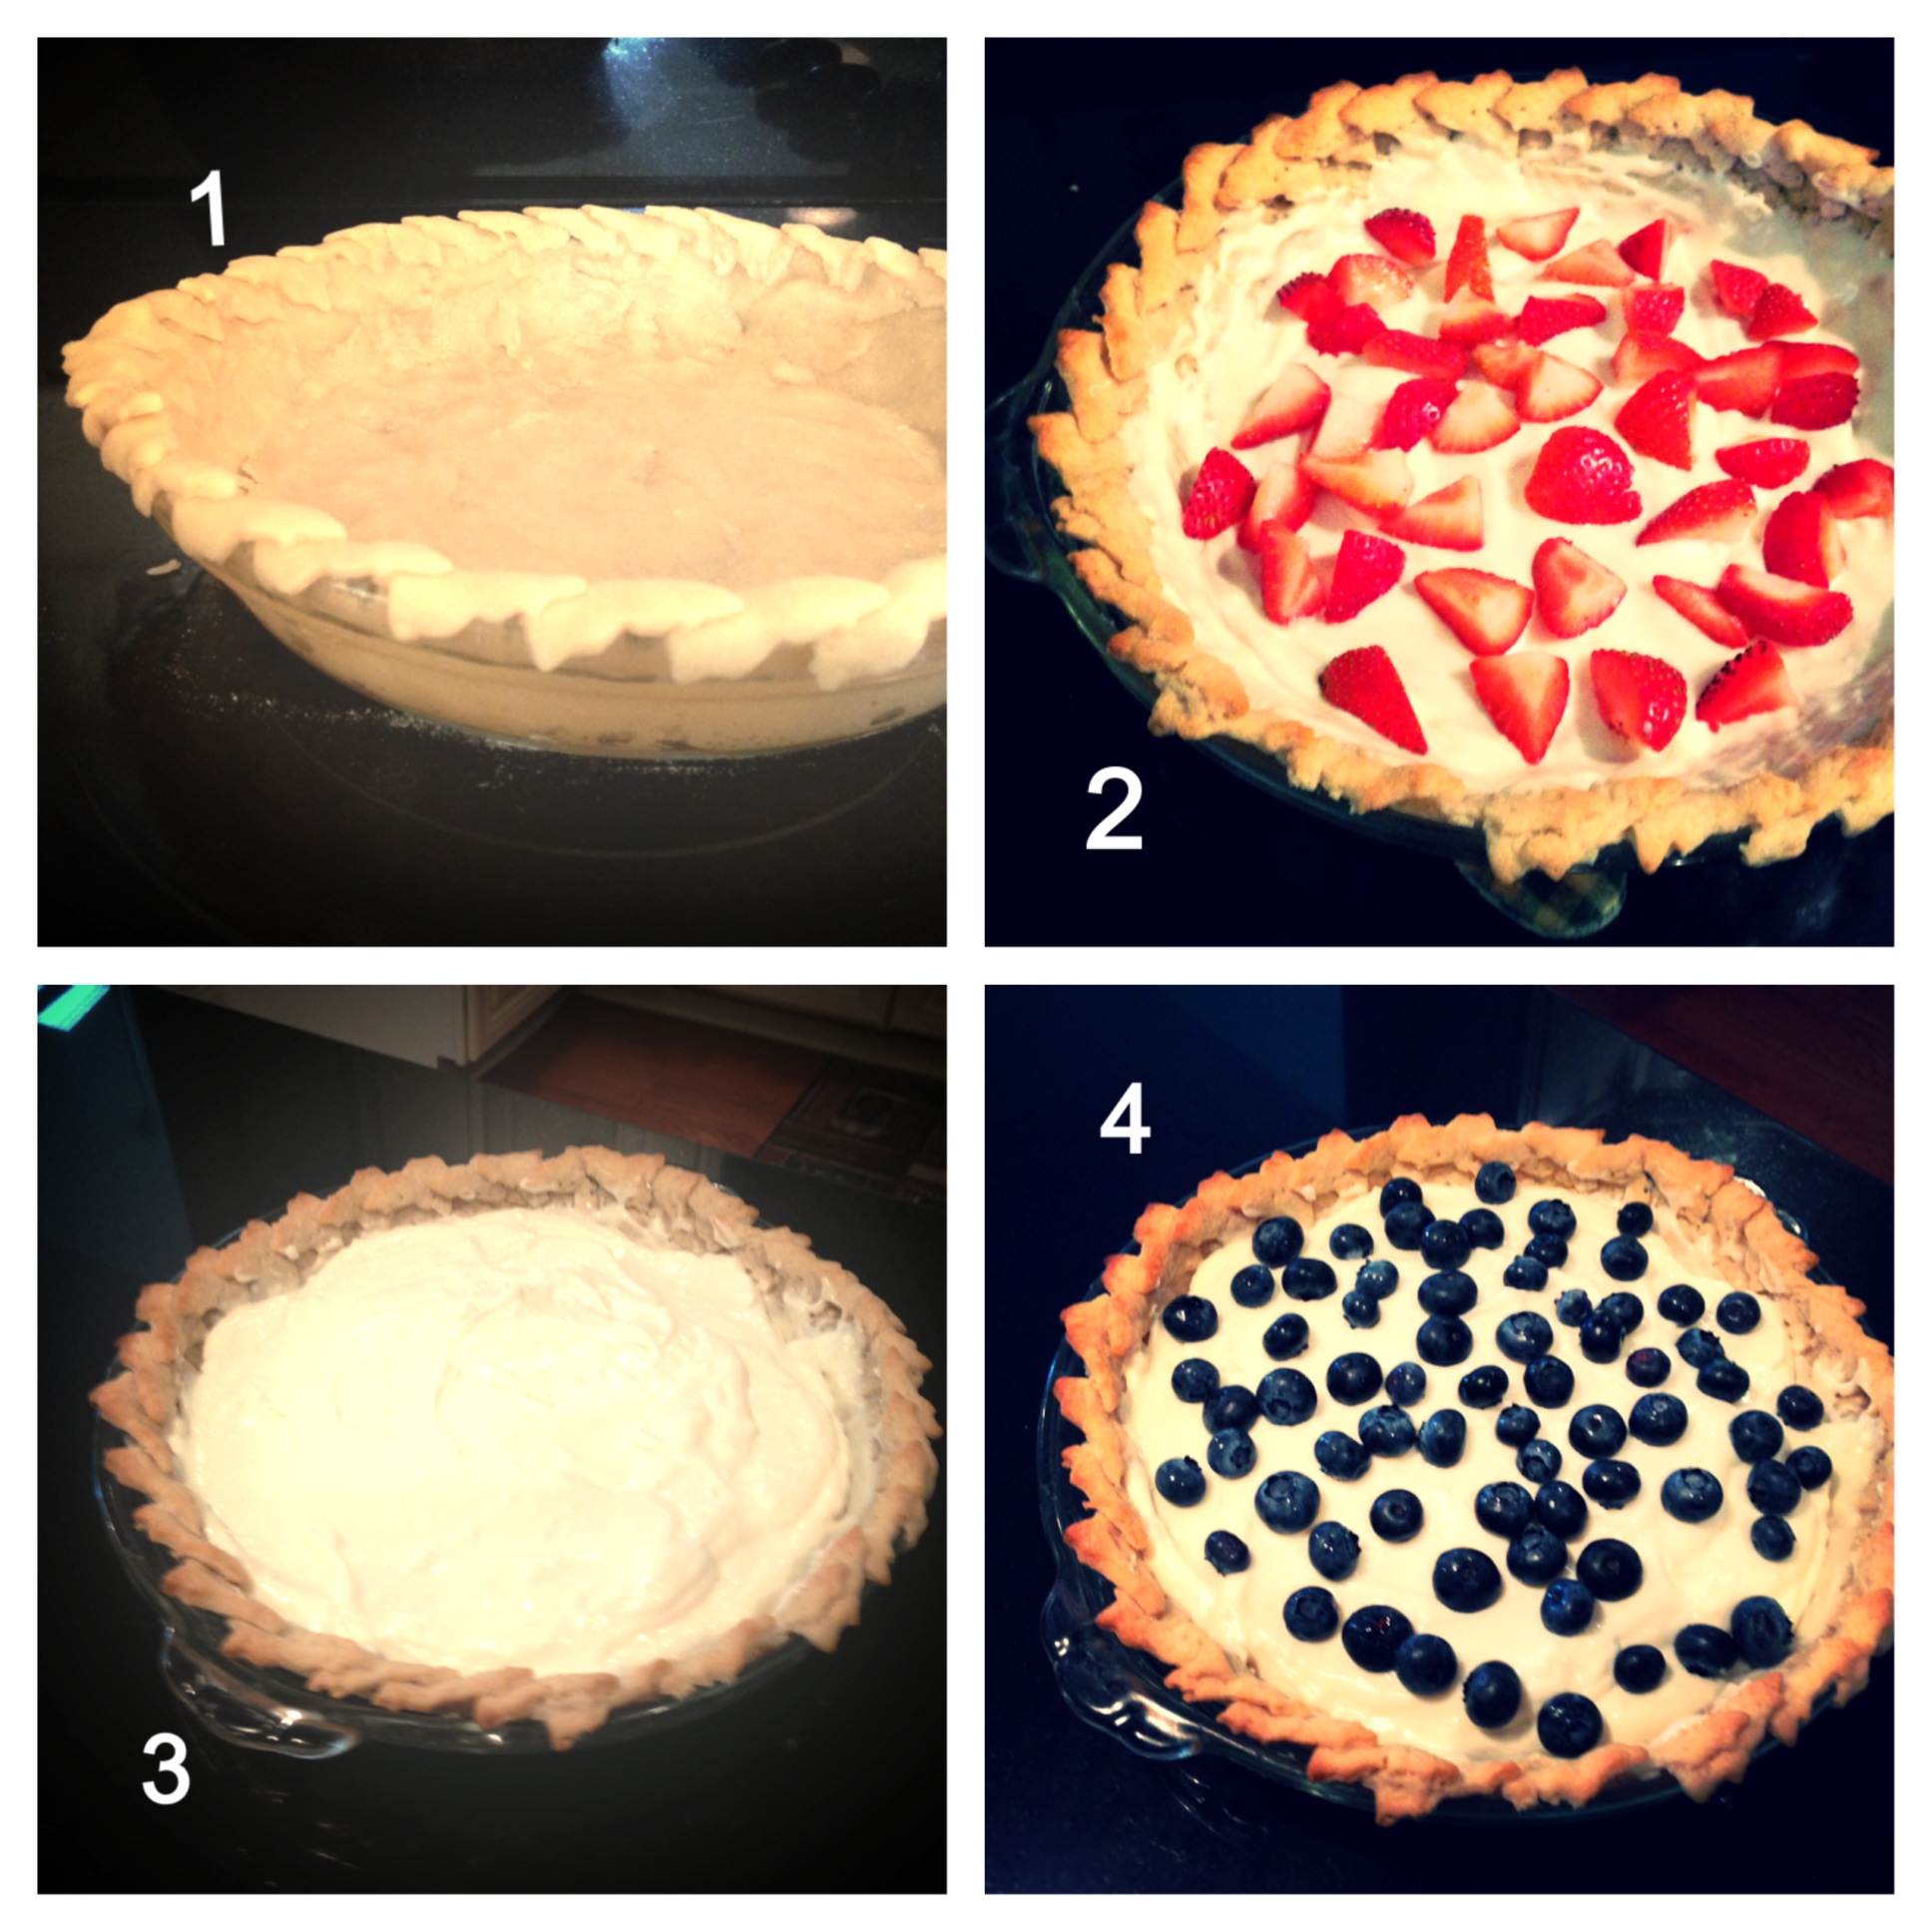
-Bake 10-12 min. till golden. Cool completely. (As seen in picture 1)
-Rinse strawberries, pat dry. select 8 uniform berries to dip in white chocolate. I always do more they are so delicious šŸ™‚ cut in half. These 8ish are for the top decoration. Slice all remaining strawberries into smaller pieces for bottom of pie.
-Melt white choc uncovered on high 1min. stirring often. DO NOT overheat. If you do you can try and save it by adding a little bit of vegetable oil!
-Dip strawberry halves place on cookie sheet covered with wax paper cut side down. Refrigerate until ready to use
-Use the remaining white chocolate by spreading evenly to coat entire bottom and sides of crust. Layer sliced strawberries on bottom of crust. (As seen in picture 2).
-For filling: Beat cream cheese until smooth gradually whisk in milk until well blended. Add pudding mix and whisk until mixture begins to thicken. I sometimes add more milk. Spread this mixture over the strawberries. (As seen in picture 3)
-Arrange blueberries evenly over top of the pie. (As seen in pic. 4)
-Pipe or dollop whipped cream over the blue berries as seen in picture 5! Place dipped strawberries and left over blue berries on top! Wherever you think they look pretty:) Refrigerate until ready to pack for your Fourth of July picnic!
IMG_1879

XO,
Alicia

Tagged , , , ,

Nancy + Eric, Kimmel Center Wedding – Hamilton Garden – Philadelphia Wedding and Event Planner – Angela MALICKI events

Wow, its been a while since we blogged. Time flies when you’re having fun. Back in October, Ash and I had the pleasure of working with Nancy and Eric on their wedding day in October. We started our day at the gorgeous Bellevue on Broad Street, where the couple and bridal party were getting ready. The girls looked amazing in their navy gowns and Nancy cool as a cucumber in her robe sipping on champagne with the girls, waiting to put on her Dennis Basso gown on.

parvis4

I love this pic of Nancy and her mom. They have such a special bond together

parvis1

parvis5

parvis3

Being that the day was perfect, Ash and the guys walked to the church in Rittenhouse square, what a great stress reliever and exercise. Nancy dressed and ready to go, she was perfect (her hair – to die for).We gathered the girls and headed to the trolley. It’s showtime –Ā we got to the church and wasted no time – ceremony in full swing. Eric waiting at the alter for his bride – I loved his expression!


parvis8

parvis10

LOVE this pic of the new couple!


parvis6


After the ceremony, the couple and bridal party headed to the Art Museum for pics. Ash and I walked to the KImmel Center for set up. What a spectacular view from the Hamilton Garden. Nancy and Eric didn’t miss a beat with details of the :”Fall in Philadelphia” theme . They had a custom painting designed by William Ressler called “Avenue of the Arts” that was used as their sign in book. Their placecards were placed underneath a massive floral display designed by Ten Pennies in the cocktail area.

In the Hamilton Garden, Central Park Band was warming up as the Garces Catering staff was putting the finishing touches to the room. The cake donned a topper of the couple, which included their cute dog Emma. It was perfect! Nancy had custom made cookies for the guests as a treat from Emma and each place setting had a sweet treat of custom made chocolates sporting Philadelphia landmarks.

parvis2

parvis7

Their first dance was perfect as they danced to Ray Lamontange, “You are the Best Thing” and the party didn’t stop there. As a surprise, Eric serenaded Nancy in front of all the guests, what a great surprise to all of us.

parvis11

We absolutely loved working with this couple and both families. Thank you for letting us be a part of your day and sharing all your special moments.

parvis-12

The couple honeymooned in Hawaii for 2 weeks – how awesome!

xo,
Ang

Professional Partners –
Vendors:
Planner – Angela MALICKI events
Venue – Kimmel Center for Performing Arts
Church – Church of the Holy Trinity Rittenhouse Square
Caterer – Garces Catering
Flowers – Ten Pennies
Photographer – Baiada Photography
Videographer – Marc Smiler – The Video Artist
Trolley – Philadelphia Trolley Works

Hotel – Hyatt at the Bellevue

Band – Central Park the Band
Dress Designer – Dennis Basso (exclusive Kleinfeld’s designer)
Bridesmaids Dresses – Bill Levkoff
Groom – Tux by Calvin Klein
Groomsmen – Tuxes by Mens Warehouse – Calvin Klein
Shoe Designer – Badgley Mischka
Jewelry – Kleinfeld’s

Tagged , , , , , , , , , , , , , , , , , , , ,

Sweet for my Sweets – Valentine’s Day Part 5 – Philadelphia Wedding and Event Planner – Angela MALICKI events


Pull out the Kitchen Aid, Betty Crocker cake mix and begin....

Pull out the Kitchen Aid, Betty Crocker cake mix and begin….


They say the way to a man’s heart is through his stomach. This may be true sometimes, at least you’ll be together on Valentine’s Day, therefore sharing your baked gift.

IĀ decidedĀ based on a survey with large group of men – box cake is what they enjoyed most growing up and an easy one to make. I thought, let me make this one a semi pretty one.

I hit up the local supermarket and picked up a few things for the cake as I thought, this is a no brainer.

These are the items needed forĀ the Valentine’s Day Cake:

2 – 9 inch rounds

Mixer (hand-held, or Kitchen Aid), if you do not have either one, a whisk would do – ouch! * Note to self – put one on your wedding registry, best choice I ever made.

2 – Ā flavors of box cake (whichever brand you prefer)

3 – eggs

vegetable oil

2 – sticks of Philadelphia Cream Cheese

1 stick on unsalted butter

2-3 cups of confectioners sugar

1- teaspoon of vanilla extract

Half a cup of cocoa powder

3 squares of unsweetened cooking chocolate

1 jar of raspberry preserves with seeds (or whichever preserve you like)

Directions:

(L) top - chocolate frosting, (R) top - melting of baking chocolate, (L) bottom - Raspberry preserve , (R) bottom - finished cake

(L) top – chocolate frosting, (R) top – melting of baking chocolate, (L) bottom – Raspberry preserve , (R) bottom – finished cake

Cake

Follow the directions on the boxes – literally – mix the eggs, water, oil and cake mix. Pour in cake pan. You will do this for both flavors. While the cakes are in the oven, start the frosting.

Frosting

Make sure your butter and cream cheese is super soft – I usually pop it in the microwave for 25 seconds until soft. This is really important.

On the stove top or microwave – melt cooking chocolate until its smooth like dipping chocolate. Put a side until needed. This may take a while.

Start with creaming the butter until soft, then add the cream cheese. They both should be smooth and mixed will. Then add the vanilla extract and confectioners sugar until blended. Finally add the cocoa power and melted chocolate. Keep mixing until all ingredients are blended well.

DIY Cake decorated, plated and delish!

DIY Cake decorated, plated and delish!

Assembly

If cakes are fully cooked – take them out of the oven carefully to cool. I had 2 large dinner plate ready, as I cut the cakes in the middle to make my layers. I cut them in half and placed each one on the dinner plate to cool thoroughly. This is important as you do not want a soggy cake.

For display purposes – I wanted the cake on a pretty plate as it a gift. You will be doing all assembly on this plate. Alternate your layers – I started with the white cake first. With a fork or spoon – scoop a bit of the preserve on the cake until fully covered. It doesn’t have to be perfect as you will add the frosting on top of that. Next, with a spatula, cover the layer with the frosting. Step and repeat with the next 3 layers. Be sure that all your layers are perfect and lining up.

LOVE this pic of my DIY Valentine's Day DIY Cake

LOVE this pic of my DIY Valentine’s Day DIY Cake

Decorating

Once your cake is completely frosted and ready to go – you can decorate it anyway you like. I had edible pink pearls – I designed a heart pattern.

This honestly took me a couple of hours to make and assemble. The end product was amazing and Todd loved it.Ā  It’s large enough to share with friends – seriously, get it out of the house, you will catch yourself picking at it.

Please share your pics of this cake with us if you made one too.

xoxo,

Ang

Tagged , , , , , , , ,